Friday, April 30, 2010

Masculine Birthday Card - May SOTM BLog Hop

It's time once again for our stamp-of-the-month blog hop! And we once again have about 60 Close To My Heart consultants participating and ready to share our ideas for this fun stamp set. If you've come here from Tammy Lea Pinchard's My Creative Clubhouse blog, you're in the right place! If you're starting here, just hop all the way around until you complete the circle. When you're done looking here, move along to Carla Ironside's blog and see what she has created this month.

Our stamp set this month is Cherish the Moment, a set of eight stamps just waiting for you to create great cards, invitations, and scrapbook layouts. They're all ready to have boxes checked or blanks filled in, for a fun & personal touch.

I decided to create a man's birthday card this month. I love to create fun girly things a LOT, and I thought it was time for some balance!


I'm told that men don't like a lot of "stuff" on their cards. Or ribbon. Or anything that might seem "girly". I thought our new Passages paper pack fit the bill perfectly, along with a scrappy looking card pattern from our Wishes how-to book. I distressed the edges of all papers using a Cocoa ink pad DTP (direct to paper). For a little more texture, I added twill tape - as close to ribbon as I dare, lol! For that little something extra, I added a shiny green button tied with two strands of Chocolate Waxy Flax. I adhered the twill tape and button using Liquid Glass; I used Tombow on everything else.

The best part? This card only took about 20 minutes, less than it would take me to hunt through the cards at the store!

Now, hop along to Carla's blog and check out her project made with this great stamp set!

We have a winner!

I used random.org to choose the winner of the Miracle kit, and our winner is Cristen! Cristen said...
"eveything you made with the kit looks wonderful. Thanks for the chance to win"
April 23, 2010 4:49 PM

Cristen, please send me your mailing address and I'll get your kit out to you ASAP!

For those of you that didn't win, if you're interested in purchasing one just click here for details.

Friday, April 23, 2010

It's a Miracle!

I can't believe I finally used all but the smallest scraps from my Miracle kit. Who would have ever thought that just two pieces of patterned paper would go so far? I did add some cardstock/card bases and embellishments to the mix, but in the end I wound up with the two layouts (4 pages) shown in the kit guide as well as eight cards in various sizes and designs. Not bad for my $5, plus stuff from my enormous stash! I have shown a couple of the cards in previous posts, but I've decided to show everything again here so you can see it all at once, as well as a list of the extra supplies I added. (I haven't journalled my layouts yet, as I really need to have more brain power for that than I have had this week, lol.) I apologize in advance for the long post today!

Here's layout #1 from the kit, and below the same layout with the Flip-Flaps open.


Next is layout #2 from the kit, and below the a closeup of the same layout with the Flip-Flaps open.

What I like most about these layouts is the Irresistible chipboard accents. You can color them any color you desire to match your photos. I used Bubblegum pink in the first layout, and Tulip in the second layout. I wouldn't have thought about using flowers & butterflies for a Thanksgiving layout before, but I think it looks just great!

Now for the cards I made to use up the rest of the paper.

First I made this note card for Mojo Monday. My additions for this were some twill tape and a sentiment stamp, plus I used a border punch.

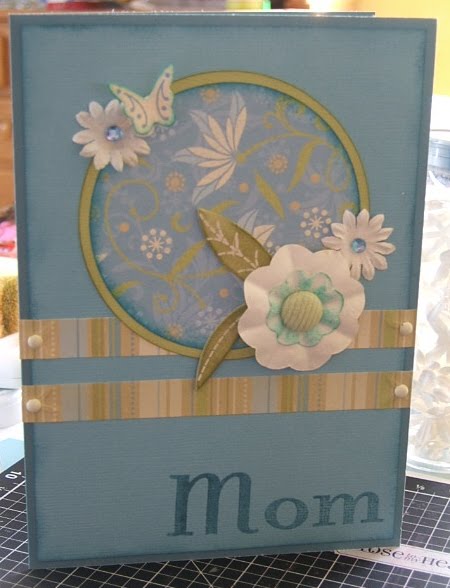
Next I made this 5"x7" Mom card for the H2H challenge sketch. I added some paper flowers, a corduroy brad, some "gems", alphabet stamps, and foam adhesive. I cut the circles using my Cricut.

Since I made the Mom card, I made a masculine card next, using CTMH's new Clear Cards (available May 1st). I pulled out a discontinued set of farm stamps with a tractor image I just love. I chose to use Barn Red to add in, since my dad is a "crops are green, tractors are red" kind of farmer!
The second picture really shows how these clear cards can give some awesome dimension simply by knowing how to layer. I adhered the Barn Red CS to the back of the card, the green PP to the inside right of the card, the striped PP to the inside left of the card, and the image to the front of the card. Before adhering the image, I used brown Staz-On ink to stamp my barbed wire image once on the inside right (I was covering a seam!), and twice on the outside over the stripes. I cut out my image using an out-of-the-box technique, sponged the edges to imply earth and sky, and adhered it to the front.

I loved making that Clear Card so much, I tried my hand with the other shape in the package, a scalloped circle, and went back to a more feminine look. I again used my Cricut to cut my circles, adding a scrap of Sweet Leaf CS, and some Colonial White CS for both the inside left and right, perfect for note writing. The Sweet Leaf was cut 1/4" larger so it appears as a border around the floral PP when the card is closed. For this card, I added paper flowers & leaves, some "gem" flowers & circles, a piece of light green ribbon, and a sentiment stamp.

Next I made a fun little gift card holder, by elongating a card template in the Wishes book. The button serves as a "handle" to pull the enclosure card out of the pocket. There is plenty of room to write a note on the front, with the gift card attached to the back using just a mini glue dot so it's easy to remove. I added just a couple of cardstock scraps to this, and cut out the baby buggy using my Cricut and the Mother's Day limited edition cartridge.

For my final three note cards, I pulled out some card bases in solid blue and green, and also added some scraps of CS and more light green ribbon. The first two use the same sketch pattern, just different colors.

I first made a monochromatic green card using the back side of the floral PP. I sponged the edges of the PP with Topiary ink, and the Colonial White CS with Bamboo ink. I added some of the remaining brads to my tree for dimension, then assembled everything.

The second card using this sketch also uses May's stamp of the month set, Cherish the Moment.

Finally, I made a patchwork-type card using the last scraps of PP and the last 2 brads from the kit. The stamps are from the July stamp of the month set, Happy Forever. (That little hedgehog looks just as great simply stamped in a neutral color as he would colored!) I also added a piece of light green ribbon.

If you read this far, you deserve a reward! I'm going to give one lucky person their very own Miracle kit! In order to win, you need to 1)be a Follower of my blog and 2)leave a comment by 11:59 p.m. on Thursday, April 29, 2010. I'll select a random winner on Friday morning (4/30).

Good luck!

Tuesday, April 20, 2010

Heart 2 Heart Challenge 3

It's week 3 of the new Heart 2 Heart challenge blog, and this week's challenge is a card sketch challenge. It took me a couple of days to decide what to do with this sketch. I've really been trying to use up my scraps lately, instead of "saving" them for later. When there are only small pieces left I tend to forget about them if I don't use them right away, so I've been trying to use up my Miracle kit leftovers this week.

With this card, I've finally used up the last of the Irresistible chipboard shapes and MyStickease (except for a scrap probably too small to use). And there are still plenty of paper pieces and brads left from the kit, so I'll probably be finishing up a few more cards with it this week. Once I get it all used up, I'll post a picture showing everything I made from it (as well as a reminder of the few extra things I used along the way).

I wanted to use a lot of blue in this card, so I added 3 colors of CS to my leftovers. I made a 5"x7" card base using Twilight CS, then a 4 3/4"x6 3/4" panel of textured Crystal Blue CS from a scrap. I then cut a 3 1/2" circle from textured Sweet Leaf CS using my Cricut and the Plantin Schoolbook cartridge. (TIP: I leave this cartridge in my Jukebox in the "default" spot because I use it so often for these basic shapes.) I then cut two 1/2" x 5" strips from the striped paper, and a 3 1/4" circle from the floral paper.

I sponged the edges of the Crystal Blue CS and floral paper with Twilight ink and the Sweet Leaf CS & Irresistibles leaves with Olive ink. I stamped "Mom" using Believe Caps and Believe Lowercase in Twilight. I assembled the paper layers using my Tombow Monoadhesive. I sponged the smaller of two identical flowers in Twilight, then stacked them with a Sweet Leaf corduroy brad. I adhered all of the Just Blooms flowers, chipboard, and gems (source unknown) using Liquid Glass adhesive. I cut a small piece of dimensional foam adhesive and stuck it to the back of the MyStickease butterfly, then powdered the rest of the back to remove the stickiness. I then sponged the edges with Twilight, folded up the wings, and adhered it to the card.

This will make a great Mother's Day or birthday card. (My mom's birthday is also in early May.)

Monday, April 19, 2010

Birthday Card Using Leftovers

I've been making the layouts from my Miracle kit (I'll post those later), and I had some leftovers I thought I would use for cards. Then today's Mojo Monday popped up, and the sketch was perfect! I changed only one thing: I put my sentiment inside a shaped frame, rather than having a separate shape and sentiment.

Here's my card:
I made a card base with some green CS from my stash. The rest of the papers, MyStickease, button, brads, and "irresistible" chipboard frame are all leftover pieces from the Miracle kit. (That's the National Scrapbook Month special from Close To My Heart, available until May 31st or while supplies last.) I also used natural color twill tape, and colored it using a sponge and Topiary ink pad. I distressed the edges of the papers using Bamboo ink and a sponge dauber. The border punch is from Stampin' Up! The sentiment stamp is from a discontinued
CTMH set.

This week's Mojo Monday sketch is:
If you want to play along, make sure you visit the Mojo Monday blog and link your card using Mr. Linky!

Thursday, April 15, 2010

You Rock! - Product Spotlight Blog Hop

This is my first month participating in the Close To My Heart product spotlight blog hop. It's just a group of consultants spotlighting a particular product or products each month, to give you more ideas. This month we are featuring the new papers in our Spring 2010 Idea Book.

If you've come here from the Paper Crafting Princess, you're in the right place. When you're done here, you'll move along to Amy Edwards' Paisley Playhouse blog.

I chose to use the You Rock papers this month, as it is my favorite of the new papers for Spring. SO useful for teens and more. I'll share two projects to give you a little idea of what you can do...

First, a NO STAMPING card:

I used leftover items from my Workshop on the Go "best" kit for You Rock, including two Top Coats elements. I left my card blank for now, so I can choose later to use it for Birthday, a nephew's upcoming graduation, or something else.

I used the Medallion pattern for a 5"x7" card, on page 52 of the Wishes book. First, I distressed the edges of all papers with my Outdoor Denim ink pad, direct to paper (optional). I adhered my star & swirl Top Coats element using Liquid Glass under the star only, leaving the rest of the design loose. I layered my two circles, the "Spirograph" Top Coats element, and the button, and used my paper piercer to pierce holes through the three layers that matched the holes in the button. Then I tied all the layers together with the hemp. The entire piece was then adhered using some 3-D foam adhesive tape. A pretty simple card using my leftovers!

I'd also like to share the layout I made using the workshop on the go guide for You Rock. I think it shows the versatility you have with this paper.

You might think You Rock is more suited to teens, but it looked great with these pics of my 4-year-old's first day of school last fall! (I changed the sizes of the pictures in the layout to work with my photos better.) Click on the picture to enlarge and see the great details in this workshop layout - cutout stars, bitty sparkles, stamped images on the B&T paper, buttons - SWEET! I just love these papers, and I can't wait to use it even more - my 7 & 8 year old daughters both got guitars for Christmas...

For more details on this Workshop, contact me or your local consultant. Now, if you're ready to see what Amy has created for you this month, hop on over to the Paisley Playhouse!

National Scrapbook Day reminder: If you're in my area (SW of Chicago in Will County), I'm hosting an all-day crop on May 1st. Contact me for details!

Thursday, April 8, 2010

NSD Crop Update - prizes!


Are you getting anxious yet for National Scrapbook Day on May 1st? I am getting so excited for our 12-hour crop here in my neck of the woods! I took a little road trip today and picked up a bunch of prizes/raffle items from Plano Molding's Creative Options line. And I'll be placing the order soon for the goody bag items from Close To My Heart!

I'm still working on some other little surprises for our crop, and it looks to be a great day to have some fun, hang out with friends, get some great product, and benefit a deserving charity. Remember, all proceeds after expenses are going to Operation Smile!

Our location, SE of Joliet, IL, is conveniently located between I-80, I-55, and I-57, making it easy to get to from any direction! For more details and registration information, visit my crop website. If you have any questions, feel free to call or email me - my info is on the crop website!

Tuesday, April 6, 2010

New Challenge Blog and My Entry

The first challenge for the Heart 2 Heart challenge blog has been posted, and I have managed to complete my entry! This challenge blog is manufacturer specific; they require you to use MOSTLY Close To My Heart products. Since I have a ton of it in my stash (I'm both a consultant AND a hoarder, lol) it will never be a problem for me!

Any-hoo, this week was a color challenge: Sunflower, Sweet Leaf, and Chocolate (or similar). I decided on a birthday card, and here's my entry:

I used regular cardstock in all three colors, and distressed the edges with direct-to-paper swiping with the ink pad in the same color. The base paper is random stamped CS, and the circle is pattern B&T Duos paper from the Emporium Creative Basics paper pack (back side). Stamp sets used are Playful Petals and For Every Occasion. I also used Sparkles and a brown corduroy brad (not CTMH). The sketch pattern I used is Bullseye from the Wishes book.

If you'd like to participate in this week's challenge, click here for their blog post.
Related Posts Plugin for WordPress, Blogger...