Thursday, September 30, 2010

Pocket Christmas Organizer - CTMH Stamp of the Month Blog Hop

Welcome to October's stamp of the month blog hop!  This month we have 70 consultants sharing their ideas for the Share the Magic stamp set, so you're sure to find plenty of ideas.  If you've come here from Shannon Pelletier's blog, you're in the right place.  If you're just starting out, you'll move on to Melinda Everitt's blog when you're done here.  Then continue along until you wind up back here.

These 12 stamps are, in my opinion, the cutest Christmas stamps you will ever see.  But that doesn't mean they're just for kids.  My project this month is a great pocket organizer for all of your Christmas needs.  It fits right in my purse, and will hold all of our wish lists, shopping lists, receipts, gift exchange names, and more.  Plus, it features some super cute paper piecing!  You're sure to get compliments everywhere you go.

This organizer is super easy to make using our True Fit Folios.  For a complete tutorial, be sure to come back tomorrow, because today we're looking at some super easy paper piecing.  Here's the front cover:
And here's the inside view of the pockets:
You can even use alphabet stamps to label each pocket to help keep you more organized.  Now, here's the outside:
If you need even more room, you can use adhesive to attach things to the outside pages, like your menu or planning schedule.  (Things you only  have one of, as opposed to wish lists for each child, or various shopping lists.)

Now, if you'd like to see the easy steps needed for that cute Santa paper piecing, read on.  If you're ready to hop, head on over to Melinda's blog and see what she has created for us today.


Stamp using Archival Black ink on Vanilla Cream, white, Sunflower, and black CS, and both sides of the patterned paper.
Use the Vanilla Cream as a base, and cut all the other colors out into pieces.
Assemble all pieces except the second set of eyebrows.
Use markers and a blending pen to color Santa's tongue, lip, and cheeks.
Using Liquid Applique, fill in all white area on Santa's suit.  (Not his beard, etc.)
After allowing the Liquid Applique to dry, use the heat gun to puff it up.  Finally, attach the second set of eyebrows.
Look how nice your completed Santa looks!

Products I used in creating this project:
That's all for today; come back Saturday for the folding tutorial to create your own organizer.  Now hop along to Melinda's blog!

Double Duty Holiday Decor

I love when things can serve more than one purpose, and my holiday decor is no exception.  I had just received my new Thanksgiving mini Cricut cartridge, but Happy Hauntings was still calling my name since I just haven't had a chance to use it as much as I'd like yet.  The solution was a fun little hanging sign from my stash.  (I tend to buy alterable items when they're on sale, and hoard them along with some recyclables to alter when the mood strikes.)

The plan was to decorate one side for Halloween, and one side for Thanksgiving.  I didn't want typical black & orange for Halloween, but some of the colors needed to be the same so I could add ribbon to the wire hanger for a more decorative look.  So, let's see how I did:


I'm going with a bit of an elegant vampire theme for Halloween this year, so I pulled this paper from my stash, traced the sign on it, and cut it out.  I decoupaged it to my sign and let it dry while I cut my Cricut Designs.  Using the Vampire font from Happy Hauntings, I cut "Beware" from American Crafts glitter paper in Rouge and the font shadow from black paper.  I cut the Bats using the Layer 1 feature for Frame 3 on page 40 of the handbook.  I added the red eyes using some Stickles in Christmas Red.  To adhere the shadow, I again decoupaged.  Helpful Hint:  I like to make my paper look like fabric by brushing on the first layer in one direction and letting it dry, then brushing on the next layer in the opposite direction.  The vertical and horizontal cross-hatching looks just like a fabric weave.  Once everything was dry, I added the pieces cut from glitter paper using Glossy Accents.

Now, for the Thanksgiving side:
Using the same process as the other side, I adhered this paper from my stash to the sign blank.  I cut this nice little Pilgrim couple on the Thanksgiving cartridge from black cardstock, using creamy white and deep orange for the layers.  After adhering them to the sign, I just cut off the excess from the "swirly" part that hung off the edge.  I cut the "Give Thanks" design from American Crafts glitter paper in Chestnut, and adhered it over the top of the Pilgrims.  Somewhere along the way I misplaced the dot for my "i" - since I didn't want to cut it again, I just pulled an adhesive rhinestone from my stash and stuck it on instead.

Finally, I tied ribbons and attached them to the hanging wire using Glue Dots Pop Up Dots.  I added a red button to the Halloween side and a deep orange button to the Thanksgiving side for a little color.

Supplies available at Cutters Creek: 
Other Supplies:
  • Creative Imaginations bare elements Brenton oval sign
  • My Minds Eye papers from The Spider's Web line
  • Adhesive rhinestone
  • Ribbons and buttons
  • Mod Podge, matte finish
  • Black craft paint (to finish the edge of the sign), optional

Friday, September 24, 2010

World Card Making Day

Saturday, October 2, 2010

Make cards for Operation Write Home, and take some home as well if you’d like.  I’ll provide all of the card bases and scrap paper.  If you have your own paper trimmer and adhesive to bring, that would be great!  Kids are welcome if they can work on their own or with your help.

Time: 7pm – 9pm (come & go)
Place: 25340 Shannon Dr
  Manhattan, IL
RSVP: 815-478-5119

Sponsored by:  http://loribrown.myctmh.com

Tuesday, September 21, 2010

A New Way To Play!

I recently discovered "Studio" scrapbooking.  Now, this has been out for a while, but I thought it was not for me as I'm not really into the digi thing.  BUT (and it's a big but) I discovered I was really wrong!  First, everything is done online, so there's no software to download (or pay for!).  The only downside is if you still have dial-up it's very slow.  But even on my "standard" DSL it's pretty fast - and since hubby's looking into the next higher level for full video streaming capability, I can't wait to see how quickly it goes.  Also, this is so much SIMPLER than regular digital scrapbooking.  To me, these are more like the photo books that you can make at Walgreen's or wherever - they are GREAT for the non-scrapper to make!  And they are much sturdier than those books, because they go in a regular scrapbook with PROTECTORS.  No more dirty little fingers leaving marks on the pages or paper tearing because it was handled roughly.

My goal for this post is to show you how fast & easy this new product is.  I certainly don't see myself using it for everything; I am a die-hard hands-on scrapper and I like to get my fingers inky.  But I see great possibilities for grandparent gifts, times when I need more than one copy of the same layout, and when I'm trying to play "catch-up".  Hey, I have three kids, and even though I try to scrap stuff for all of them, I still have a lot of baby pictures of all 3 that haven't made it into a scrapbook yet.   Of course, I can't use my old film photos in Studio scrapbooking, but I can use any of my digital photos, which gives me time to scrap the prints the classic way.

OK, so let me say that this software will allow you to play for FREE.  You can upload & create all you want and not have to pay unless you choose to print.  So follow along step-by-step, and try it out!

First, you need to create an account.  Don't worry, there's no funny stuff going on; there just has to be a way to save your photos and layouts for you to come back to.   Click here to create an account, and try out Studio J!  There's not much needed to create an account.  Here's a shot of the form:

Once you save your account, you can enter Studio J and get started!  You will want to start by creating a new project.  It's very simple from there; there are only 5 steps needed to complete a layout:
  1. Upload photos. 
  2. Choose the desired themed kit. 
  3. Select an exclusive layout pattern.
  4. Add photos, embellishments, title, and journaling. 
  5. Purchase custom-printed layouts ready for a cherished album. 

The hardest part for me is always step 1 - well, actually step 0.  I always have to decide which group of pictures to use, make sure they're all rotated and edited, and then decide which make the cut to be included.  Nice thing is I can upload whatever I want (up to 20 at a time) and I don't have to use all of them.  For this layout, I have chosen 12 pictures from my son's preschool graduation this Spring.  The more you upload at once, the longer it takes, of course. (The size of the files also affects the time.)

Once the photos are uploaded, you click the Continue button.  There are several kits to choose from.  There are some kits that are only for those people who purchase a membership.  (I will discuss memberships later, as they are NOT required.)  I am choosing "Rough n Tumble" for it's bright colors and fun designs.  Once your kit is chosen, you again click the Continue button. 

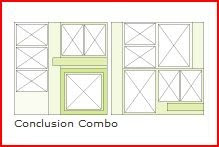
This takes you to the available patterns.  You can choose from all available patterns (again, there are some only for members), or you can decrease the number of patterns by choosing how many pictures you want to use.  You may also want to check out the patterns for one or two fewer or more photos than you have, as you are able to change things around some; feel free to play as you can always back up and change things later.  I'm choosing the pattern available for 12 photos, called Conclusion Combo.  Here's an example of the thumbnail sketch for this pattern:

Choose your pattern by clicking on it, then click the Continue button.  This takes you to a pop-up screen where you choose a paper mix for your kit.  You WILL be able to change the colors in a later step if you desite, so just concentrate on the B&T (pattern) paper sections.  Click on your selection and again click on the Continue button.  Here's what my selected pattern and paper mix looks like:
I will be changing at least one paper color to better match my photos, but this is the stock option.  At this point, you can rotate or swap the pages, add your photos, and add color to or remove the suggested embellishments on the layout.  After that, you can add titles, journaling, MyStickease elements, and distressing techniques by using the menu on the left side of the page.  The first time you click on a heading, it will take a moment for the items in that section to load.

There are a ton of options you can use (or not use), like adding distressing, extra embellishments, journaling, etc. so I won't walk through them step-by-step.  The best thing to do is play with the options yourself, and you can always call or email me if you have questions.  Both phone # and email are available on my website.  OK, I've played around a little, and here is my final layout:
It took me about 45 minutes, with a couple of interruptions from phone calls, and I've only made a couple of these layouts before today.  It will get faster every time as I get to know the system better, but it's already much faster than the classic way I usually work.

Now, to touch on the memberships I mentioned.  If you become a member (monthly or annually), you get some added benefits.  Members get additional choices for paper kits and layout patterns.  Members also get their first ten layouts each month for half-price: that's $6.50 for each 2-page layout.  In addition, members receive free Memory Protectors with their layouts, free shipping, JPG files of each layout free with purchase or purchase separately, and special deals and promotions.  For more information on Studio J, including some Frequently Asked Questions, just click here.  You are also welcome to call or email me with any questions you might have, and if I don't know the answer I will get it for you!

If you like it as much as I do, I would LOVE to have your business!  I truly appreciate every customer I have.  And don't forget to share this terrific product with your non-scrappy friends!  I think they'll like it too.

p.s. Coming October 1st are Online Gatherings - now you can host a party without the work, all online.  There are no hands-on projects, but there are plenty of ideas on my website and here on my blog.  Reap the rewards without the work!  And the best news is that Studio J memberships and layout 5-packs DO count toward sales totals for Hostess Rewards.  Contact me for full details!

Watch This Space!

I'm too excited about my most recent project not to share, but I just can't show the whole thing yet.  My post is scheduled for September 30th, both here and over on the Cutters Creek blog.  (I have to stick to the team calendar, lol.)  So, the best I can do for today is a sneak peek and a reminder to watch this space on September 30th.


Now even better is when I tell you that BOTH of these pictures are from the SAME project.  Do I have you intrigued yet?  Then be sure to return on the 30th.

I'm also working on a post for this afternoon about a new thing I've been playing with.  I'll just say this: it's super easy AND super fast, so I LOVE it!  Be sure to check back later for my post!

Friday, September 17, 2010

First Day of School Layout

This is my project over at the Cutters Creek blog today.  There are several design team members, so be sure to head over there and see what everyone else is up to!

Call me strange, but I just love the first day of school!  To me, it always feels more like a new year than New Year's Day does.  I've always loved the smell of new clothes and new school supplies, and the hint of Fall to come (my favorite season).  I also love seeing the changes in my kids from year to year, so this was an especially fun layout for me.


I notice it's a little hard to see in the photo, but that American Crafts glitter paper really makes this layout pop.  And by creating a visual triangle with my glitter paper, it's very pleasing to the eye.  You can get SO many projects from each sheet of this fabulous paper since it's so eye-catching. 

My super cute title and paper pieced school are cut with my Cricut using the Locker Talk cartridge.  If you scrap kids or grandkids, this cartridge is a must-have!  There is everything from preschool to high school, playground to driver's license on here and you are sure to get your money's worth from it.  The title is cut at 3.25" and the school is cut at 2.5".  The extra apples were cut using the layer from the title, at 2.5", and I hand cut the leaves to match.

I also used the Plantin Schoolbook cartridge to create the scalloped photo border, using my Gypsy to get it sized the way I wanted.  I used the same technique along with Everyday Paper Dolls to create my walking trail using the Blackout feature with the road design.  Combining pieces from different cartridges is a great way to personalize your designs.  My kids walk to school for the first few years, and we use the walking trail behind our house to get there.  Years down the road, it will jog their memories of walking to school by adding this feature to my layout even though it isn't in this set of pictures.  Think about these types of things when planning your cuts, and don't feel you have to stick with what's included in a single cartridge.

The patterned paper & CS is from my stash.

Items available at Cutters Creek:

Thursday, September 16, 2010

Cricut Canvas Clock (say that 3 times fast!)

A while back, the clockworks in one of our clocks went all wonky on me.  Since I was going to  have to replace it anyway, I decided to make a new, more "artsy" clock.  So, I headed to my favorite Michael's, picked up a 2-pack of 16x20 canvas and a 1/4" clockworks.  Back at home, I pulled out some papers and paint in colors to match the room, some matte finish Mod-Podge, and my Cricut and French Manor and Stone Script cartridges.  (FYI, French Manor is a Cricut Circle exclusive cartridge.)

I wound up entering this in a contest over on the Cricut Circle message board, but of course I didn't win.  My theory is because I used an additional cartridge in my project.  Or at least that makes me feel better about not winning, lol.

So, here's the finished clock:

All of my papers are from Close To My Heart, as are the adhesive gems.  I cut my clock hands out of both cardstock and chipboard to make them more sturdy.  The French quote means "Sadness flies away on the wings of Time."  It is from Jean de la Fontaine, a French poet and fablist (sp?).  I thought it was the perfect quote for a clock.  The quote and clock numbers are from the Stone Script cartridge, and all other cuts are from the French Manor cartridge, many of which I modified using Design Studio.  As a final touch, I added a bunch of Stickles to outline some of the shapes.

I love my new clock, and every time I look at it, it makes me smile.  That makes it a winner to me, no matter what!

Tree-mendous Card

This is my card for this month's sketch challenge over at Rubber Stamp Chat.  The challenge is being hosted this month by Starving Artistamps, so I'm using an image from their Into the Woods stamp set, and my inside sentiment is from the matching  sentiments set.


This fun tree image has all kinds of little circles in it's branches, and they make the perfect place to put little buttons, brads, whatever.  I chose to give my tree a Fall feel, by using various sizes & colors of brads to fill in the circles.  I cut out my image using the out of the box technique.  I colored in my grass with Copic markers - 2 shades of green, a little brown, and the colorless blender.  I colored my sky with a blue watercolor crayon from Stampin' Up! and a water brush.  The patterned paper and ribbon are from Basic Grey's Mellow line, and all cardstock, stamping ink, and large gllitter brads are from Close To My Heart.

I'd love to see you participate in this month's sketch challenge, so head on over to Rubber Stamp Chat to play!

Wednesday, September 15, 2010

My Big BAD - final blog candy winner

Well, I just realized that I forgot to post my final winner for birthday blog candy.  That's a super big bad on my part!  Thanks to random.org, our final winner is simplybren - Bren, please email me with your mailing address and I'll get your prize out to you.  All blog candy prizes will  be going out this week, so if any winners haven't gotten me their mailing address yet, please do so ASAP!  Thanks and congratulations to all of my winners.

Saturday, September 11, 2010

Thanksgiving Card

Using my new Thanksgiving mini seasonal cartridge for my Cricut.  Bought mine at Cutters Creek!  Papers are CTMH from my stash (read: no longer available), with CTMH inks & CS.

Friday, September 3, 2010

My First Cut Using My New Cricut Gypsy

So, I finally received my Cricut Gypsy, and now I don't know why exactly I held out for so long (other than price, of course).  I've only played with it a little, but I did manage to get it synched, and I even transferred a file I created in Design Studio into it and cut it out.  The next step will be figuring out to to create a file on the Gypsy itself, but you know, I AM going to be 40 next week, so I hope my "old" eyes can handle the smaller screen!

You may remember this layout I showed a while back for a scrapbook class I was having.
I already had the photos chosen, and almost as soon as I had this finished I KNEW I need to create my title using Gypsy Font!  So as soon as I got my file transferred, I cut my title, inked it up, and glued it down.  And I was right, it's just PERFECT.


It looked so pretty, I almost hesitated to journal in my own handwriting.  But that's part of what I feel makes scrapbooking so special.  I almost always journal by hand, rather than printing things out on the computer; I think it feels much more personal this way.

I LOVE my Cricut, and I love it even more with my Gypsy!  Even more so, I love the community I've found in the Cricut Circle.  I admit, it was an expense I found very difficult to justify at first, but ProvoCraft has made it so worth my time and money.  The special message board for the Circle is so much more intimate and easier to use than the regular MB (which I never visit anymore).  And PC has allowed Circle members to help them donate Cricuts to schools through our suggestions, and will soon offer a similar program for hospitals.  (I personally plan to request on for St. Jude Memphis.)

We also have another awesome Circle benefit coming up soon, involving the Imagine world launch on HSN on September 14th.  And you can find out the details by joining the Circle now (I'm not allowed to share the info outside of the circle).  Circle memberships are now open again, on an invitation only basis.  If you'd like to receive an invitation to join the Circle, please email me and I'll have one sent to your email address.  There is no obligation; the email simply allows you into the registration area so you can see the details for yourself.  Believe me, it's a decision you won't regret.  But hurry, registration closes again after September 13th!

BIG Birthday Blog Candy & Winner #4

Sorry for being AWOL for a couple of days.  Yesterday was a just plain crazy day around here, and this morning I've had some kind of allergy/sinus thing going on that was kicking my butt!  I have now managed to get a big weekend blog candy pack together, and I have a winner of Wednesday's blog candy.

Thanks to random.org, the winner of all those pretty chipboard alphas is #3. Manhattan Mandie, no need to email me your address, I'll drop off your prize!

Now, for today's blog candy.  I'll leave this one open ALL WEEKEND; all entries received by midnight on Monday, September 6th will be eligible for this awesome prize:

This candy includes two scrapbooking kits from Close To My Heart, as well as a National Scrapbook Month kit complete with patterns and all embellishments needed to make 2 two-page layouts.  Just follow the directions and you're all set.

How to enter:  receive one entry for each of the following items.
  • Leave a comment.
  • Be a follower or subscribe to my feed through a reader, leave another comment letting me know.
  • Sign up for my newsletter and leave a comment letting me know.  (Be sure to leave your name when signing up for the newsletter so I know who you are.)
  • "Like me" on FaceBook, and leave a comment letting me know.
  • Repost this giveaway on your blog, and leave a comment with a link to your blog post.
Remember, I also have a special customer only giveaway as well.  Sign up for my newsletter and you'll find out how you can win stamp pads in all 8 new colors from Close To My Heart!

Wednesday, September 1, 2010

It's a Thriller - September Stamp of the Month Blog Hop

If you're looking for today's Birthday Blog Candy post, please scroll down to the next post.  If you're  here for the blog hop, Welcome!  If you've come here from Jen Rubio's blog, you're in the right place!   When you're done here, you can hop a long to Kathy Lickenbrock's blog and see what she has in store for us.

September brings a fun and creepy stamp of the month set called Thriller.  These 9 stamps are not-so-scary fun, ready to haunt your next creations.  And if you have a boy in the house like I do, I can easily see using some of these stamps for other things (Pirate Valentine cards, anyone?).

So, my 5-year-old son (known as The Boy), has been begging to have a Halloween party this year.  Unbelievably, I'm actually considering it.  But no way will I host a kid only party; families would be invited, which I feel requires a bit more sophistication, lol.  Using Thriller, along with the new Party Pennants stamp set, I've come up with these three items:

The Boy approves.

Sticking with my sophisticated theme, I stuck with basic colors of Cranberry, Black, and Colonial White.  All images were stamped using VersaMark ink and heat embossed in black.

Invitation:  I used the Edge Distresser on my Colonial White panel, then layered it on a black mat, and adhered it to my 4.25" x 5.5" card base.  I stamped my image on Cranberry CS and cut it out with my Micro-tip Scissors.  It's adhered to the card using 3-D Foam Tape.  Inside, I repeated the mats and stamped the "Scary Halloween To You!" Sentiment and embossed.

Food Label Tent: Yes, this looks like a place card, which it could be used for.  But with picky kid eaters and allergies abounding, I thought these would make splendid cards to label each dish on a buffet.  I again used the Edge Distresser on the Colonial White.  I also used my craft knife to cut the top half of my main image so it would stand while the card folds in half.

Tombstone Treat Box:  I made my treat box using my Cricut and the Happy Hauntings cartridge.  For a similar option, you can Google a printable version.  I used Grey Flannel CS, and distressed it by swiping Grey Wool on it directly from the ink pad.  I stamped & embossed my main image on Cranberry CS.  I then repeated this on Colonial White.  I cut out the entire Cranberry CS image, then cut out only the skull of my Colonial White CS image.  I popped the skull up on 3-D Foam Tape.  I stamped the Happy Hauntings sentiment on Colonial White and cut it out in two separate pieces and adhered it to the box.  I assembled the box AFTER adhering the parts to it.

Don't forget!  This month not only brings a new stamp of the month, but a new Autumn/Winter Idea Book.  I absolutely love the four new paper lines in this catalog, not to mention all of the great new stamps and embellishments.  When you have some time, pop on over to my website and check out all of the new products.  You're sure to find something to love as well!

Now, head on over to Kathy's blog to see what's next!

Birthday Blog Candy #4 and Winner #3

Welcome back for another day of birthday blog candy!  Thanks to random.org, my winner chosen for today is #5 Teela.  Teela, please email me with your mailing address and I will send out your goodies.

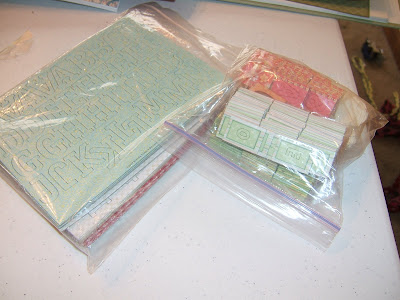
Today's candy is two bags full of chipboard letters.  They're already pretty so you can use them as is, or alter them up to match your project.  There are all kinds of patterns in there!


Today's entry is another comment day.  Leave a comment and be entered, it's that simple!  For an additional chance to win, forward this on to your friends.  If they mention your name in their post, you each get an additional entry.  Good Luck!
Related Posts Plugin for WordPress, Blogger...