Saturday, April 30, 2011

Chairs To You! May Stamp of the Month Blog Hop

Welcome to another Stamp of the Month blog hop! This month we have over 50 consultants on board to share their fabulous ideas with you. If you're here from Tammy Lea's My Creative Clubhouse, you're in the right place. If you're just starting out, you only need to continue on from here and work your way around until you're back where you started! When you are done here, you'll move along to Carla's Carla Creates blog.

The images in this month's stamp set are a hot trend right now - chairs!  With several styles to choose from, and some great coordinating sentiments, you're sure to find many uses for this set.  For my sample this month, I chose to create a fast & simple card.


The simplicity of this 10 minute card makes it perfect for mass production.  I think these would make terrific thank you cards for bridal shower or wedding gifts.  I started with a 4.25" x 5.5" card base in Olive CS, then added a 2.25" x 5.5" piece of striped paper to the top front.  I cut a .25" x 5.5" strip of Colonial White CS and lightly sponged the top & bottom edges with Desert Sand ink for dimension, then added it to the card.  I stamped the overstuffed chair stamp on the floral paper, cut it out, and popped it up on 3-D foam adhesive tape.  I then stamped the sentiment and heart image (3 times) directly on the card using Cocoa ink.  I used a matching Cocoa marker to color in the 3 hearts so they would show against the stripes.

Additional supplies used to create this card:
That was it - super simple!  Now, head on over to Carla Creates and see what she has in store for us today!

Thursday, April 28, 2011

Royal Tea Bridal Shower Blog Hop

Once again, it's blog hop time!  Since we're starting a day before the royal wedding, we're declaring it a bridal shower, but we'll be here for two days of projects.  If you've arrived here from Theresa "The Scrapbooking Queen", you're in the right place.  If you're just starting out, you're welcome to head over to Cardmonkey's Paper Jungle and hop through the whole list.  When you're done here, you'll want to be sure and head over to Michelle at Queen of My Craft Room and see what she has up her sleeve!

 So, I mentioned the other day that my daughter is excited to get up early and see some of the hoopla surrounding the royal wedding.  I'm sure she's not the only one planning a "viewing party", so I thought I'd create a layout appropriate for scrapping the event!  (Remember to click on the photos to see them larger.)


Be sure to click on this photo to see the medallions I stamped on the background using Versamark ink!  Looks much better in person, lol.


This picture shows better detail on one of the stamped medallions and the way I cut my paper strips to follow the medallion's shape.  I cut my title using the Elegant Cake Cricut cartridge, and welded the font shadow using the Gypsy.  I added some self-adhesive gems for a little added bling.


Here's a closeup of my flag pennant banner and the cardstock strip I embossed using a Cuttlebug folder.  The gold string is actually 3 strands of DMC Light Gold Thread (282) braided together.  The flag pennants are part of a printable set from Lettering Delights, and the entire set is free through Saturday!  They also have matching SVGs and an alphabet, all on sale during Dollar Days, which ends TODAY.  The anchors for my banner are just gold brads, spaced at 1.75".

I used gold crowns to bookend the journaling block.  Since I wasn't totally sure where I was putting them, I made the crowns separately and adhered them to the CS later.  I stamped in gold ink on white vellum, heat embossed with gold embossing powder, and trimmed around the images with micro-tip scissors.   I added some self-adhesive gems to the crowns for a finishing touch.

Supplies used in this layout:
  • red, white, and blue cardstock from my stash
  • Cricut cartridge, Elegant Cakes, and Gypsy
  • Cuttlebug embossing folder, Textile Texture
  • Medallion Stamp, Stampin' UP!
  • self-adhesive gems in clear, red, and blue; Close To My Heart
  • gold brads
  • DMC Light Gold Thread, #282
  • British flag pennant printables, Lettering Delights (you can get lots of freebies just for creating an account; get more every Friday via their FB page!)
  • Royal Birth stamp set, Close To My Heart
  • Versamark and metallic gold stamp pads
  • gold embossing powder and heat gun
Now, time for some blog candy!  I'm giving away two MyAcrylix stamp sets, Friendship and an exclusive mini stamp set, plus a 6x6 mini album in red (perfect for scrapping your Royal viewing party!).  In order to win, just leave comment on today's post.  I would love if you would become a Follower, but it is not a requirement to win!


Thanks for stopping by today - hope to see you back soon!  Now it's time to hop on over to Michelle at Queen of My Craft Room for her project.

Let's Get Ready to Hop!

Our Royal Tea Bridal Shower Blog Hop will begin in just a few minutes, and I am SO excited!  Be sure to take the time to visit everyone, as there is sure to be some fun blog candy along the way!  In case you get lost somewhere, here's the list of participating blogs:


Ellen at http://cardmonkey-business.blogspot.com/
Alex at http://youhadmeatcraft.com/
Jennifer at http://craftycardgallery.blogspot.com/
Nicolette at http://beyondscrapin.blogspot.com/
Jessica at http://customcreationsbyjessica.blogspot.com/
Stacey at http://creatingacraftylife.blogspot.com/
Holly at http://scrappily-everafter.blogspot.com/
Jacqueline at http://madebyjacqueline.blogspot.com/
Corri at http://buglvr.blogspot.com/
Mandie at http://mandiesscrappin.blogspot.com/
Christel at http://onescrappinsista.blogspot.com/
Nadia at http://nadiasbeautifulmess.blogspot.com/
Theresa at http://www.thescrapbookingqueen.com/
Lori at http://savingmine.blogspot.com/
Michelle at http://queenofmycraftroom.blogspot.com/

Monica at http://scraps2treasure.blogspot.com/
Amanda at http://stellarscraps.blogspot.com/
Brynn at http://flairandfrillscreativity.blogspot.com/
Nikki at http://theglamoroussideofscrapping.blogspot.com/
Elaine at http://expressionsbyelaine.blogspot.com/
Gina at http://ginascraftingspot.com/
Shannon at http://purplelionpaper.com/blog
Lisa at http://lisahjulberg.blogspot.com/
Jen at http://jenscraftcorner.blogspot.com/
Sue at http://susanascorner.blogspot.com/

Wednesday, April 27, 2011

Ready for the Royal Wedding?

Even if you're not an anglophile, all eyes will be on William & Kate this Friday.  A royal wedding is the modern-day equivalent of the Cinderella story, and many of us have to at least have a peek at what it's like.  My almost ten-year-old daughter insists that she is getting up early to watch it, but at least she is smart enough to not try and get up at 4am!  (She's aiming for 6, lol.)  At any rate, little girls shouldn't get to have all the fun, so I have joined the Royal Tea Bridal Shower Blog Hop. 

Come on back this Thursday & Friday and check out all the great projects we have in store!  Some people will have a new project each day, so be sure you come back both days.  I currently have 1 project ready, but I do have another in my head so if I have time to get it done I'll have a new one each day too!  Also, there's sure to be blog candy on some of the blogs; I'll definitely have some here.  All projects will be related to tea, weddings, and/or royalty, so your sure to find some fun ideas to scraplift while you're here!

So, starting Friday at 6am Eastern, come on back here and start hopping!  Just look for our badge on the blogs along the way, and get ready for a royal good time.

Thursday, April 21, 2011

Seeing Green

No, I'm not talking about jealousy!  I realized just now when I ordered my laundry & dishwasher detergent that it had been a while since I posted anything about that kind of "saving".  I'm talking about saving the environment, saving money, and saving my family's health with one simple thing I do every month.

Since 2008, I have placed an order every month from a well-known "wellness" company, that strives to keep us healthier in our homes while also keeping our planet healthy.  I also happen to work in a grocery/drug environment, so I know first-hand the effects of chemical off-gassing when I walk down the cleaning & laundry aisles in the store.  (If I spend too much time in those aisles I start getting a headache, I have trouble breathing, and all of those scents are horrendous.)  While I have had some health problems the last couple of months (colds, flu, ear infection - but I think they may have been related), overall my health is better than before and even my kids are rarely sick.  But what I really love, in my own selfish little way, is the cost, the smell and the product effectiveness.  No more scrubbing (yay!), and no more leaving the room every 10 minutes because I'm gagging from the smell.


If you're interested in a healthier, greener home, do me a favor.  Watch this short video (and check out the other videos on the channel if you'd like).  If you want more information, let me know.  I'd love to share my experiences with you, and let you know how you can live your life with fewer toxins and more green (for the planet AND for your wallet).

Wednesday, April 20, 2011

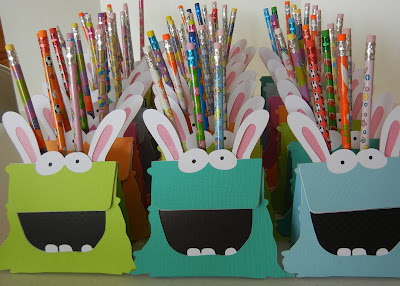
Here come the Easter Beasties!

I always try to be the "treat bag mom" for at least one of my kid's parties every year.  This week is the "Spring" party, and I found the funnest little SVG file over at Lettering Delights!  The file is called Easter Beasties Bag, and I needed a whole herd of beasties!


Don't they look excited to be here?!  Those pretty colors are all American Crafts cardstock in Tropicals.  The white CS is CTMH, the pink is Bazzil swiss dot, and the black is a combo of CTMH and Bazzil swiss dot (because somehow I managed to let myself run almost completely out of black CS - time to order more!).

After I imported the SVG into my Make The Cut software, I added three small circle cuts to the back side of the bag.  I had some parents send pencils for the bags and it was the only way they were gonna fit!

The best part about this SVG is how quickly they go together.  The pieces are all big enough to not get lost and make for easy stacking.  Even folding the bag goes quickly.  To make sure everything held together properly, I used my Scotch ATG for the layered bits, then assembled everything using Scor-Tape.  (I would swear that "Sookwang" is Korean for "best damned tape EVER", lol.)  In fact, these are so easy that the kiddoes & I are going to make some  more this week.  And all I'm going to do is cut, and maybe help fold.  I'm making them do their own assembly!

Monday, April 18, 2011

Tutorial Tuesday: Custom Stamped Embellishments

Today is another installment of Tutorial Tuesday at the Cutters Creek Design Team blog, and it's my turn to share again!  Be sure to check out the CC blog so you can see all of the great ideas from the other DT members as well.

Welcome to another installment of Tutorial Tuesday!  This month features stamping, and I thought that this week I would share an unexpected combination of products used to make some cute custom dimensional embellishments.  So, we'll be using stamps (of course) and the Imaginisce iBond cordless glue gun with colored glue sticks!

Have you ever looked at colored glue sticks for glue guns and wondered what on earth you would want to use colored glue for?  Today I have just one splendid little answer for you.  Let's make dimensional embellishments!  But first, I have to say that I LOVE the iBond glue gun - the cordless feature makes it so easy to get things done without wondering how the heck to get that cord out of the way.  In fact, I have several other projects I can already think of that I''ll be using this for this year.

Now, rather than ruin the surprise, I'm going to make you wait until after the tutorial steps to see what I've made.  Just check out these steps:

First, you will need a non-stick surface and your iBond loaded with the glue sticks of your choice.  Turn on your iBond and let it rest on the mat.  (Another great feature of the iBond - there's a light at the tip so you ALWAYS know when it's turned on!)

While that's warming up, you will want a few additional items.  Choose a small stamp image, stamping block if acrylic, and ink for your stamp.  You need to ink up your stamp for this process, but most ink will not stay on our stamping surface.  You can just use a clear ink for no color, or Staz On if you want your image colored.  I chose to use a red Staz On for my image, just so it would show up better in the photos.

First step: coil a circle of hot glue slightly larger than your stamp image, making sure your coiled glue lines are touching.  You may want to experiment with the thickness for some different effects.  (I apologize for the odd picture here - it's hard to glue left-handed and take a picture right-handed!)  I tried to keep mine about the thickness of the stream that comes out of the tip.  Colored glue tends to be stiffer than clear, but you should still have plenty of time before it hardens up.


Once your circle is made, quickly ink up your stamp and press it into the hot glue.  Leave the stamp in place for a minute while the glue cools, then you can pull the stamp out of the glue and peel the glue off of the non-stick surface.


You now have two options with your stamped piece: leave it in a circle, as I chose for my card, or trim it down around the image.  A nice thing about using glue is that it trims super easily with a pair of fine-tip scissors.  At left is an example of a trimmed image.  This would look cute at the center of a ribbon bow, or perhaps three in a row on a card front, mounted on circles or squares.  When left whole, these embellishments give the appearance of wax seals, with a lot less fuss.


Now, on to my end product!  I created a card and used my embellishment as an accent piece in my design.


Using a card sketch from the Wishes book and some discontinued papers from my stash, I got to work!  The cute girl stamp image is Cheeky Howdy from The Greeting Farm and the cherries stamp image is from the Kitchen Classic stamp set from Crafty Secrets.  Cheeky Howdy's outfit is paper pieced (see last week's Tutorial Tuesday on the DT blog), and the scalloped mat/frame is from the Elegant Edges Cricut cartridge.  I cut the rosette using Make The Cut software and the Accordion Fold Rosette SVG set from Lettering Delights.  I adhered the stamped glue embellishment to the center using Glossy Accents to ensure it stays put.  As a finishing touch, I added Xmas Red Stickles to the cherries in my girl's hair and the circle cut-outs in the frame.

Friday, April 15, 2011

April Product Spotlight Blog Hop

I'm joining in on the fun with the product spotlight blog hop this month, and all eight of us will be featuring a My Creations product from Close To My Heart.  If you've come here from Wendy's "My Scrapbooking Blog" you're in the right place.  If you're just starting out, you can continue on to Adeline's blog when you're done here and work your way around in a circle.

For my project, I've chosen to feature the My Creations Memory Showcase in the 6" x 6" size.  (This is the same accordion album my daughter's Girl Scout troop used for the book I posted the other day.)  This is one of my favorite products, as I love all of the things it can be used for.  This smaller size is perfect for a brag book for Mom or Grandma's purse, stands on a table and even spread out doesn't take up much room, and at only $3.95 can also be used for a special birthday (or other occasion) card.

I chose to decorate mine for a baby boy, as I have a neighbor expecting soon.  I used our former Miracle kit from National Scrapbook Month (2010, I believe), but our current Miracle papers and MyStickease would make a great substitution.

The Front Cover

The first set of inside pages
The second set of inside pages
Back cover
Inside pages on the back side

The new mom can easily just stick down 4x6 photos without cropping if she likes, and the papers are light enough in color that she can even write directly on the patterned paper.  I used our new Kraft cardstock on the front and back covers, because it is nice and sturdy and won't show wear as quickly, especially if it will be sliding in and out of a purse.

Close To My Heart products used:
Other Products used:
Now it's time to hop on over to Adeline's blog and see what she has cooked up for us this month!

    Thursday, April 14, 2011

    Calling All Echo Park Fans

    Will you PLEASE go Like Echo Park on FaceBook and tell them that Lori Brown sent you?  They make some of my favorite papers, and I could win their ENTIRE collection!!  And you just know that I will be able to share some here since I already have some of the lines...

    Thanks!

    Tuesday, April 12, 2011

    What Girls Can Do

    Last night, I hosted my 4th grader's Girl Scout troop for a scrapbook event.  We made mini (6 x 6) accordion albums, and used only paper.  The only thing I did was cut out the Girl Scout logo using Make The Cut for them to use on their front page, told them about matting some pictures, and let them loose.  (NOTE: This is allowable use of the GS logo, since it is troop level individual use.  You would not, for example, be able to cut this logo and sell it.)  My daughter later went through my paper flowers and added some, and she still needs to journal, but this is how they turned out:

    This is the "outside".


    This is the "inside".

    It folds up accordion-style so they can either close it and lay it down, or stand it and display it on their dresser or desk.  I didn't get to see everyone's, but I am amazed at how well they did considering most of them had no clue how to use a paper trimmer or tape runner before they got there!  Never underestimate the power of girls to just get in there and do it.

    Sunday, April 10, 2011

    Hey There Cupcake

    I apologize for the lack of posts last week; I've been recovering from this nasty ear infection (and still can't hear out of my left ear), and once I was able to spend time on my feet I started back up with my Spring cleaning.  This means that posting is likely to be sporadic for a while as I continue to deep clean and declutter (that is, sneak things out of the house when the husband and kids are gone!) my way to a decent looking house again.

    But I did need a birthday card for today, and I've been DYING to play with my new Elegant Edges Cricut cartridge, so I popped this cutie together last night.  I used the Cricut Imagine, along with both Elegant Edges and Kate's Kitchen (I cart).  This saved me from spending time hunting through my stash, as I just needed a couple of sheets of white textured cardstock.


    To create my card base, I used the 5:7 rectangle from the Imagine shapes, resized it to 7" (which made it about 10" wide), and colored it with one of the patterns from the Kate's Kitchen cartridge.  Next, I sized the doily shapes from Elegant Edges at 4.5".  I colored the solid shape with the darkest blue from the KK cartridge, and the cutwork doily with a pattern from the cartridge.  I chose one of the cupcakes and sized it at 2.5", and the made with 100% love label and sized it at 1".

    After printing and cutting the 2 sheets of cardstock, I assembled my card, popping the cupcake up with dimensional foam adhesive tape.  I pulled out my Lagoon ink from CTMH, and inked up the sentiment stamp from the Cupcake Sprinkles stamp set for the front of the card.  I also used the same ink color to stamp Happy Birthday on the inside of the card, from the Party Pennants stamp set.  That's it; all done!

    Thanks for stopping by - I hope to have at least one more project for you some time this week, I just don't know when!

    Monday, April 4, 2011

    Tutorial Twofer Tuesday at Cutters Creek

    It's my turn to host Tutorial Tuesday on the Cutters Creek Design Team Blog...

    Stamping Your Own Patterned Paper AND Masking

    Happy Tuesday everyone, and welcome to our first installment of Tutorial Tuesday for April!  This month we're focusing on stamping, and since I am the self-proclaimed Simple Stamping Guru, I'm jumping right in with two easy techniques today.  Initially, I was just going to focus on making your own custom patterned paper, but I needed to mask an image for my card anyway, and since it's an easy yet oh-so-useful technique, I just added it right in.  Trust me, I don't like doing things that are "hard", require a lot of products, or take a lot of time.  So, make yourself comfortable and see for yourself how easy stamping can be!

    Let's start with a technique called "random stamping" to make your own patterned paper.  It's really a misnomer, as it's not random at all, but when you're done it certainly looks that way.  This is such a useful technique, for times when you don't want to search for the "right" paper for a project, or just don't have something in the right colors.  I have been known to be slightly obsessive (OK, maybe not slightly) about my papers matching my pictures in my scrapbook pages; to the extent of making my own patterned papers that match the clothes my kids are wearing in the pictures.  But that's a story for another day...

    I'm making a card, because the smaller size makes it easier to learn the technique.  (If any of the pictures are too small for you, just click on them to see them larger.)  To begin, stamp a single image near the center of your paper.  I stamped right on my 5 x 7 card base, choosing to make my entire background patterned.  For this project, I am using a single stamp for my pattern, but as you practice, you can add more stamps, and/or rotate the stamp(s) for more variety.

    Next, stamp the image twice more, forming a triangle shape with the three images.  I chose to keep my images all facing the same general direction, but you can rotate for a different effect.

    Continue stamping images, creating more and more triangles on your paper.  Make sure that when you approach the edges that you allow the images to go off the edges of the paper where they would naturally fall.  (Ever notice that patterned paper you buy doesn't usually contain only whole images, that shapes run off the edges of the paper?)

    Since I used a line drawn stamp, I chose to color my images with Copic markers.  I colored using a very informal style, freely going outside the lines, as it was easy to color each petal and leaf by simply laying the brush tip against the paper for each one.

    Don't worry about making your image spacing or your coloring perfect.  Trust me, no one will notice when you're done!  Now, on to masking:

    This technique allows you to group images together, making them look like one is in front of another.  There is no limit to the number of images you can combine into a scene, but I most commonly use only two images together.  It looks so much more "advanced" when you mask than if you just stamp the images next to each other.  The only additional supply needed is a Post-It note (or if you don't have any, use a piece of printer paper and adhesive tape.

    First, stamp the image you want to appear in the front of your scene on your cardstock.  Then stamp it again on your Post-It note.


    Cut out the image you stamped on your Post-It, and stick it directly on the image you stamped on cardstock.

    Next, stamp the other image right next to the first, slightly overlapping where you want it to appear behind the first image.

    Peel off the Post-It note, and voila! You have a masked scene.  For my purposes, I cut out my masked images, added some extra detail and colored them.

    To assemble my card, I also stamped and colored a border and cut it out.  I trimmed 1/4" off the right edge and adhered my border image and some ribbon.  Then I popped up my stamped image on a matted panel, added a custom sentiment, and DONE!

    I thought this would make a great card for a  couples shower, casual wedding, or a fun anniversary card.  Just add the additional sentiment to the inside of the card and you're ready to roll.

    Products available at Cutters Creek:
    Related Posts Plugin for WordPress, Blogger...